Today’s article is “somewhat” technical, without becoming “very” technical.
Depth of field (dof), and shutter speed are the key to both the “nuts
and bolts”, and the art of photography. Anytime I taught photography
to a true beginner, my first job as to explain the shutter and its
varying speeds, and not only how those speeds related to stopping or
blurring action, but how it let in more or less light, and then the
aperture and how it also let in more or less light to blend with the
amount of time the shutter was or was not open, to create the proper
exposure.
Depth of field, was the next lesson.
Depth of field, is not just the residual effect of the necessary
blending of aperture (f-stop such as f5.6, f22 etc.) and shutter speed
(1/125th sec, 1/1000th sec. etc.) to create a proper (or desired)
exposure, it is a part of your composition.
The majority (not all) of the compositional choices we make with our
cameras, were invented by painters, long before the advent of
photography. Some of the differences we have are due to the lack of a
painter’s ability too see through different focal lengths if you will.
It was not natural for a painter to see a “sandwiched” view as it
would be through a 800mm lens for instance, or the distorted view we
can have by using a 7.5mm fisheye lens. Excepting those distorted (but
great) visions photographers have due to varying camera lenses, pretty
much everything we do came from painting.
I watch pretty much every painting show that is on TV. When they paint
in a certain way that it matches what we do with our cameras, they
will usually tell the viewers how it relates to photography because
then beginning painters, who are often experienced photographers, will
understand better. While almost all painters of outdoor scenes will
teach the use of depth of field, most get the concept backwards. Even
self-described Plein Air (outdoor location) painters generally get the
idea of depth of field wrong.
When they paint a scene, and they decide to promote depth and distance
in their painting, they will lightly brush areas in the receding
distance into softness. That is in fact the affect of shallow depth of
field. Because they feel they are promoting the feeling of depth, they
always refer to this as increasing depth of field. With a camera,
total near to far sharpness, is actually the promotion of dof because
the sharpness and recognizable aspects of the background, has been
extended or increased if you will. More depth of field, is when most
or all the subject is covered in focus.
Depth of field is sometimes merely the result of the need for a
certain shutter speed, in congruence with an f-stop, to get a desired
exposure. Whenever possible however, that aperture or f-stop if you
will, should be used to add or subtract to your photograph, based on
your artistic desires and vision.
It is important to note, that with most of if not all of the images
below, I used my depth if field preview lever to check if the dof
matched my vision. It is generally best when using that preview lever
to stop down one f-stop at a time so your eyes will be able to adjust
to the darkening scene before you. When it becomes dark in the
viewfinder, remember your slowing shutter speed will compensate when
you trip the shutter and balance the scene for a proper exposure.
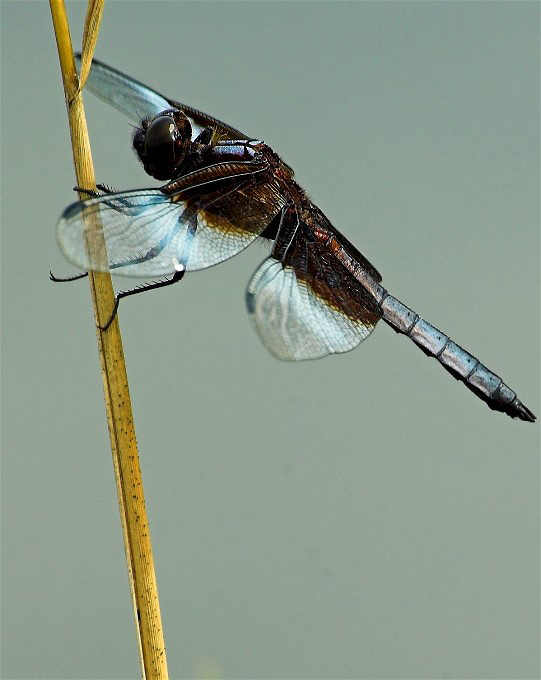
In general, when I was able to get simple uncluttered backgrounds
(this is a pond in the photo below) for an animate subject like a
dragonfly, I would use all the depth of field I could get, to keep the
critter “appearing” sharp. I mean, if the background is simple and
doesn’t grab our attention, why not show the subject in all of its
glory.
Alas, the shutter speed, f-stop combo has some limitations. I used a
300mm lens for this photo and even on a tripod, I needed a moderately
quick ( 1/125th sec.) shutter speed to arrest the motion of subject
movement due to wind. For a proper exposure, or better said for the
exposure I wanted, that meant I needed an aperture of f/13. That is a
fairly limited amount of dof for having a completely sharp (in focus)
appearing subject. Sometimes we just do the best we can, but I moved
the odds in my favor by making sure, I captured the head/face and body
in focus, while I let the wings on both sides of the dragonfly, go
soft. Its perch, is also sharp where it meets the subject. To me, that
makes this image acceptable and interesting. It is sharp and in focus
where it needs to be sharp and I focus.
My memory fades as to the names of many of the subjects I photographed
in those “days of yore”, but this seems to be one of the Widow
Dragonflies.
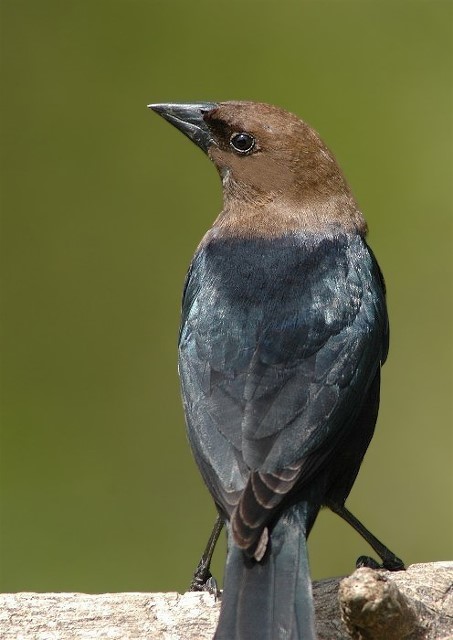
My memory is clear as to what a male Brown-headed Cowbird looks like,
and that is what you see in the next picture.
I had some of the same issues making this photo, as I did the previous
one. I made this image with my Nikon 500mm f4 lens, and a tripod. I
shot the scene at 1/320th sec., which was as slow as I dared go if I
wanted a sharp picture that accurately portrayed this handsome chap.
For a proper exposure which I also wanted, that meant f/5. Not a lot
of shutter speed, and an equally risky aperture. I put all of my
attention of focus on the birds head and face. My f-stop, was too
shallow to cover in focus, the birds rear end and tail feathers. If
his rear end was away from the camera instead of towards it, it would
not matter at all, and maybe even “artsy-up” the photo a bit. As is,
the part of the bird that is closest to the viewer’s face, is out of
focus. That’s not my preference but this is still an image worth
saving and sharing, because of the face.
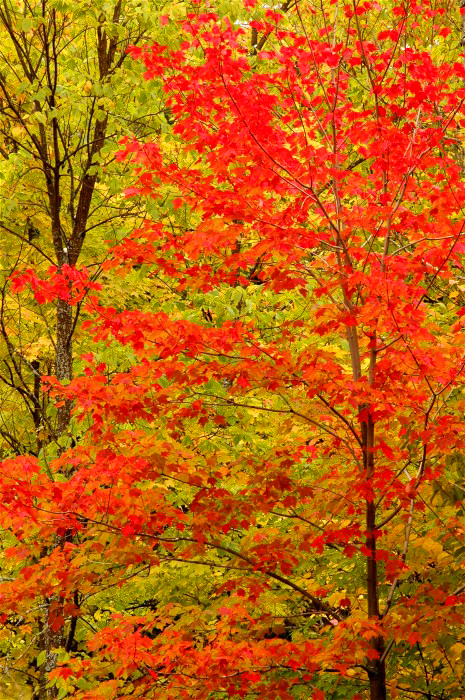
Early autumn is upon us, and the need for images that contain “super
maximum” dof is often necessary. I made this image (digitally)15 years
ago in northern Wisconsin (I believe). I wanted to show the deep rich
colors of autumn sandwiched with the colors of early autumn. Red but
then sandwiched with those which were green, barely turning yellow. I
wanted the red and the pale yellow to contrast with each other, but do
so on one, flat plane.
I made this image at f/11, which just barely kept the front tree, and
the back trees, in equal focus. They are further apart than they might
appear. I would have loved to have used f/22 or f/32. I only used f/11
because of a slight breeze. That aperture, gave me a shutter speed of
1/40th sec., which was just enough to arrest that motion in the
leaves.
A lot of what photography is about, is problem solving and compromise.
Photography in fact, almost always contains some compromise. Use your
technical knowledge, and your artistic instincts, to promote your
vision. Depth of field is a large part of that.
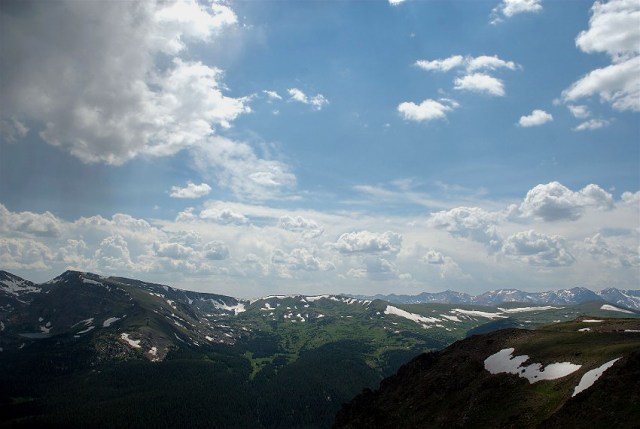
Landscapes are subjects that are famous (among photographers) for
maximum dof, usually accomplished with wide angle lenses.
The perspective with this image, which was made high up in the Never
Summer Range of the Colorado Rockies, is somewhat misleading, even
though it was made with a traditional wide angle lens, and a moderate
aperture.
The lens here is 18mm, but with an old lens on a digital camera, which
makes the useful focal length really about 27mm. Still wide and a
common focal length for landscapes.
Wide angle shots like this stretch out the foreground, rather than
compress it as would a telephoto image. The difference in this scene
over a common wide angle landscape, is that the land itself disappears
fairly quickly. In other words, the mountains and scenery, don’t shoot
up into the scene in the distance, because I and my cameras are at
such a high elevation (over 14,000 feet) when I made the photo. The
point I was attempting to make when I tripped the shutter, was to gaze
into a completely in focus background, but one that accentuated the
height I was at, and therefore the height future viewers like each of
you would be at. That was an artistic choice. One that required using
maximum depth of field for the image.
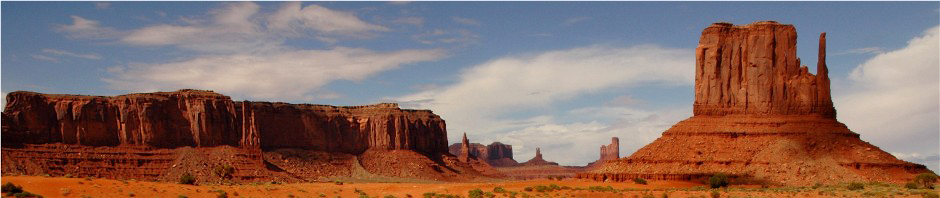
Wide angle, total dof shots are great for showing an expanse into a
valley. Of course, even as experienced photographers we can be fooled.
This image was made in Dinosaur National Monument Colorado/Utah. It is
expansive but is it a wide angle image? Well, seeing that all the exif
data is inexplicably missing, I would guess that I photographed this
expansive canyon, with a lens that falls somewhere in the normal
(50/55mm) to short telephoto (60/75mm)m range. The key to this image
for me, was to show what I wanted to show, no more, no less, and have
enough depth of field to cover everything in focus. A wide angle
lens, would have merely pushed everything back in the scene, and made
it appear small and distant.

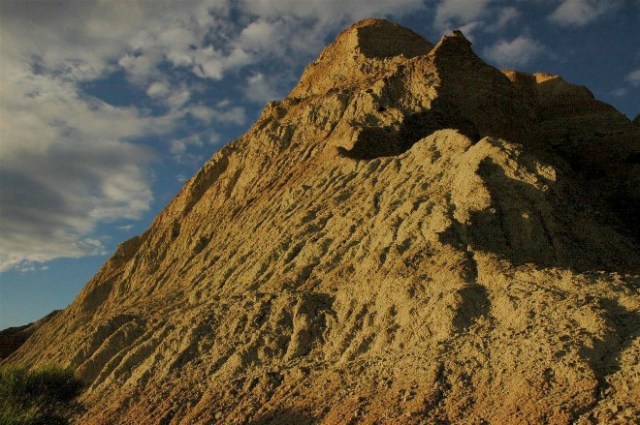
This next image was made in New Mexico, and once again I wanted
everything to be detailed and crisp. With that said, I preferred a
telephoto image to isolate this sandstone rock form in back of that
little patch of grasses, and against that unique sky. I once again
have not data on the picture. I backed off from the subject, in an
effort to include (and sandwich) those three elements together.
If memory serves me, and occasionally it does, this was shot in the
200mm range. I do not of course know my f-stop, but I am guessing I
simply stopped down to maximum (maybe f/32) and used either a cable
release or my self-timer (my normal means for hands off photography),
to prevent camera shake, and clicked away changing compositions every
so often. I can tell today even without a perfect memory of the
moment, that I wanted the grasses, the rock, and the sky brought
together, showing both color contrasts, as well as contrast of
texture.

This old (Nikon D100) digital original of a Prairie Smoke flower gone
to seed, was a problem at the magnification you see here. I used my
Nikon 105mm Micro lens from very close, and a good tripod dropped to
its lowest vantage point. The shutter speed was 1/15th sec., with an
f-stop of f/29. At the close distance I was to the flower, even f/29
provided limited dof. My goal was to get the strands of “arms” and
“feathers” both sharply rendered, while keeping the background as
unobtrusive as possible. I was forced to live with some soft areas at
the base of this “gone to seed” blossom, and the stem, but it was well
worth that sacrifice.
This was my personal viewpoint, or artistic vision of the subject.
Absolute perfection is rarely realized, as is the case here, but we
can all get close to that objective, with a little thought and
knowledge of depth of field.

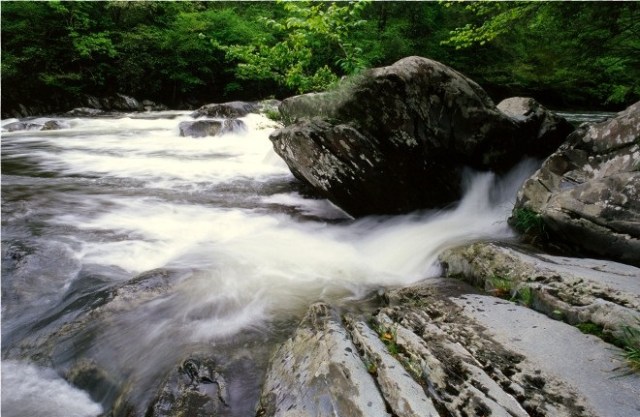
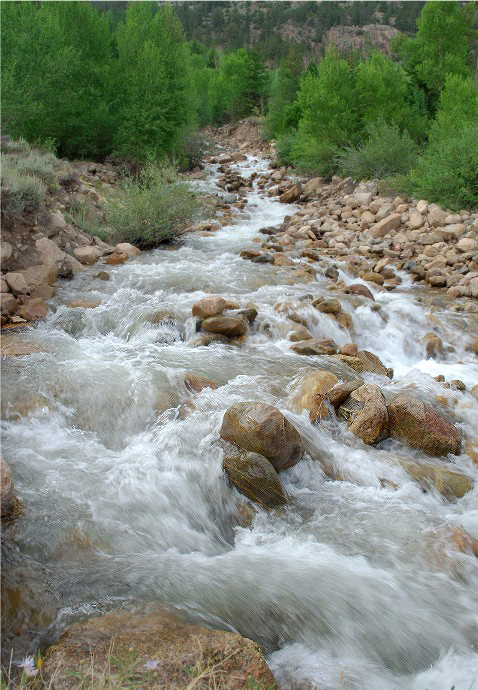
These rain covered grasses were believe it or not, photographed with a
wide angle 18mm lens from very, very close. I wanted my depth of field
to completely cover in focus, all of the grasses, and rather than use
a longer lens with a tripod that was ten feet up in and air, I chose
to use my photographic vision and knowledge to accomplish what I
wanted.

Creating landscapes that are covered in focus from near to far, are a
time honored tradition, which began in painting, and is carried on
with passion by photographers. I love making these sorts of images.
There is nothing like standing in an interesting scene, and walking
around thinking about perspectives and lens choices. Move a little
here, tweak a little there.
This Colorado scene is classic as far as showing what is meant by
“grand landscapes” which are sharp from right in front of the lens, to
infinity.
I used a an 18mm lens for this image. Those flowers and grasses are
only inches from my camera, but the mountains are a long ways away. I
used an f-stop of “only” f/20 because of the wide lens. This was my
vision from the start. This is what maximum depth of field looks and
feels like.

Leading lines and maximum dof are a tool that has been used for a
couple thousand years by painters, and for 160 or so by photographers.
A leading line, can be anything, wide or thin, that draws viewers into
the rest of the scene. It gives viewers a direction to travel, so to
speak.
There are other ways to make use of leading lines and max dof than
with landscapes.
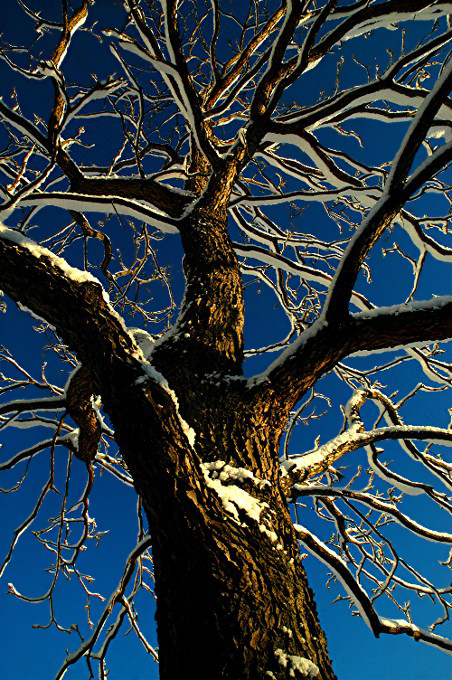
The perspective on this wide angle (max dof) image of a winter tree,
is in fact, that of a leading line image. 18mm, 1/100th sec, at f/22.
I could not see this scene in any other way than with max dof.
Viewing landscapes in only a wide angle perspective, I would think,
would be just as great of a tragedy as would be never using the great
dof wide angle concept.
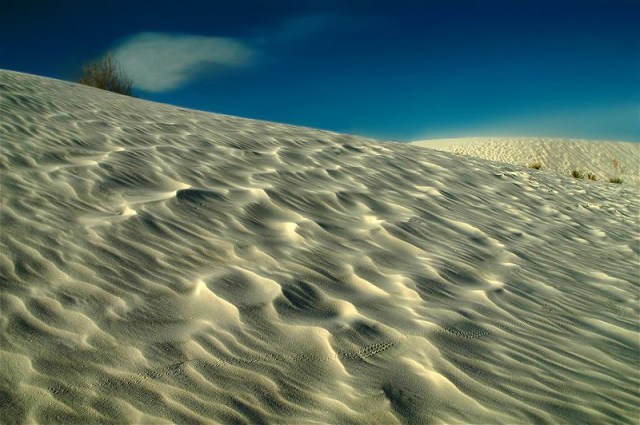
This first image from Great Sand Dunes Colorado, almost looks like it
was created with something in the 300mm-500mm category. That illusion
is because those 400 foot tall dunes are not only in front of a
massive mountain, they are logistically close together. I only needed
135mm to gain the telephoto vision that I had in my mind.

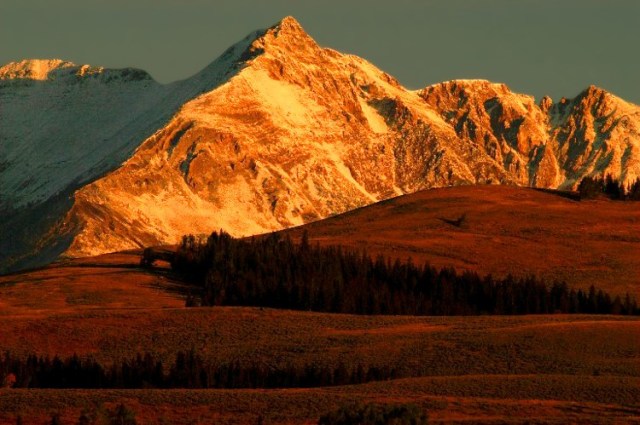
This Rocky Mt. snow capped peak, with auburn grasses in the
foreground, needed the “sandwich effect” to say what I wanted it to
say. I used a 300mm lens, which required an aperture of f/22 to arrive
at the exposure I needed, while “smooshing together” and compressing
the distance between the hills and the mountain.
I do not want to express to you, that maximum dof field is the only
way, or even the best way to bring your vision to fruition. Shallow
dof is a useful artistic tool in image making.
This little scene, of an insect clinging to a plant, was not
abstracted to this degree intentionally. This is close to what I
wanted to get done, but a little more dissolving of the plant stem,
and a little more crispness in those eyes would have been appreciated.
Ultimately, this image falls into the “failure” category for me.
The point to be told is, we need to try different things, and using
dof creatively is a major component of what you can do.
This image was made at 1/40th sec, and f/13. F/13 at this degree of
closeness, is very shallow.

Shallow depth of field is indeed a great creative tool. I began to
make this image of one lone Tulip in front of a garden of the same
species, with maximum dof. I hated the nearly but not quite out of
focus flowers in the background. I was stuck between preferences at
f/32. At f/1.8 my front Tulip was only partially sharp, and that
missed the point as to why I set up to make the image in the first
place. F/6.3 was perfect. It rendered perfect, the sharpness to the
lead flower, but made the background flowers soft enough to make them
sort of dreamy. They are in fact separated by my use of depth of
field.
A little drama never hurts and that speckled shaft of light coming
from above, helps create drama in the image. Alas light is a subject
for another day.

How much or how little depth of field you give to a particular image,
is not limited just to how your f-stop corresponds to your shutter
speed for exposure. It is a creative tool that is among the most
potent you have. Whether you see any given subject as crisp from front
to back, or soft and dreamy with one sharp edge, or soft from front to
back, it’s your choice. Of all the creative choices that you can
make, how you add or subtract depth of field from a photo is the most
important as to how you transform an image.
May God Bless,
Wayne

