Today I will keep up with an Earth Images tradition and share with you
some of the finest images from the finest image makers. I have
followed these three photographer/artists for quite some time and am
proud the call each them a Facebook friend, even though our paths have
never crossed.
The first two images below are powerful in their composition and use
of negative space. Where image space is concerned, a negative is truly a positive.
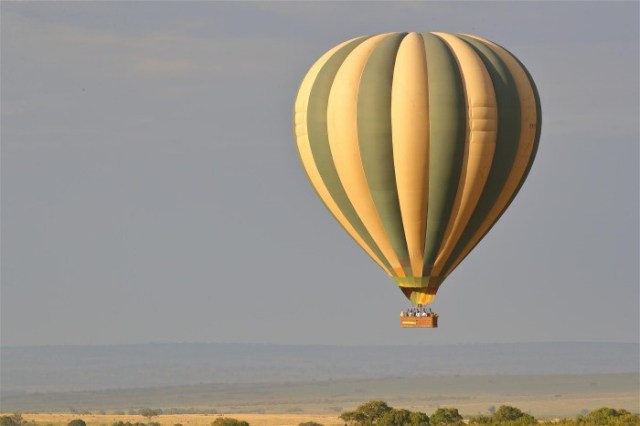
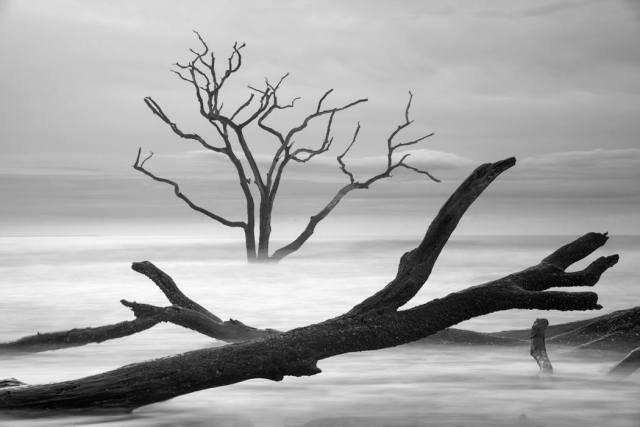
John Gerlach made the hot air balloon image and Tony Sweet the graphic
black and white photo. Both are brilliant in the “less is more” school
of artistry.
The use of a large hot air balloon, composed decidedly off center to
emphasize the air itself, and that little sliver of land at the bottom
make this image a favorite of mine.
What a wonderful mix of soft, misty surroundings with those stark,
craggy logs and lifeless tree. This image is almost a contradiction
with its graphic forms while the remainder of the photo lies formless.
Charles Glatzer is one of my favorite wildlife photographers. This
again, is composed in an almost minimalist fashion. The plain white
snow makes that statement. Negative space, is a compositional positive in this image as well.
The animal is a Japanese Serow and as usual Charles has made a tack
sharp picture with beautiful texture and a great pose.

As always from these three, beautiful work!
——————————————————————————————————
I’ll begin with my disclaimer. In no way did I choose which pictures
of mine to use today based on the great imagery you see above. That
imagery represents three of the top photographers in the world. My
selection simply fits the theme I chose to write about today, but most
of all, the files were handy.
I know that I don’t write a lot about the more highly technical
aspects of image making any more. That’s primarily because most of the
photographers who read this blog are already technically proficient.
Today I will touch on a subject that I have written about in the past,
and have taught in the field many times.
There is one subject that defines every image made. Depth of field is
always a factor in all forms of photography. It reaches epic levels
when you are working very close to your subject. I always say that
composition is about what to leave in, what to leave out. Depth of
filed is also a part of composition, and the question becomes, what to
get sharp (in focus) and what to allow to stay soft or out of focus.
Let’s start with the thought that there is always a single point of
focus in a photograph. That being the specific point where the
photographer either manually or with auto focus “focuses” their
lens/camera on a subject. Then we must admit that the focus falls off
or softens continually as you move backward or forward from that
point. However, everything parallel to that point of focus, be it to
the left or right, or up and down, will hold the same sharpness
(focus) as the original point. If that area of sharp focus, is harder
to achieve the closer you are to your subject, either physically or
via a longer lens, and it is harder, then by facto, close up and long
lens image making is more limited in its ability to render near to far
sharpness, or to create a feeling of more depth of field.
Those above concepts, are really all any photographer needs to know in
order to use depth of field effectively in their image making. The
real reason of course is, that longer lenses or/and close proximities
to subjects, will compress the same amount of real estate that is
visually stretched out with shorter/wider lenses or by taking up
positions that are more physically distant to a subject.
Whenever you are close to a animal subject, and your view and future
image is an elongated view from near to far, you won’t be able to
achieve sharpness from front to back. Most people who view an image
made from those circumstances, will never even realize that most of
your subject is out of focus. It simply seems natural, even though it
truly is not.
When you have to make decisions on a subject like the salamander you
see below, always shoot for the eyes first. Then stop down the lens
if you can, just enough to cover in focus, what is in front of the
eyes and therefore closer to future viewers.
Despite the limited focus here, and despite the fact that I shot this
picture at f/32, it works with everything in back of the eyes out of
focus. I was close to the subject and used a 105mm short
telephoto/macro lens for the photo.

The more flat sided you are to your subject, which in this case is a
Northern Water Snake, the less depth of field or focus coverage you
will need.
I made this first image laying on my stomach with my camera/lens on a
jacket. I employed a 300mm lens with an aperture of f/10. That f stop
did not quite cover the upper body where it curves (am issue when
making snake pictures) away from us, but I sharpened that area and it
is more than acceptable.

This second picture was captured shortly after the first as the
subject moved about. I made this one with a tripod, but I used my 105
macro lens. My close approach means less depth of field, but I managed
to cover the eyes and face, and that worked.

I was able to capture this bee on a flower, while using a tripod and
300mm lens. The bee is in focus, although not 100% sharp, and the
flower goes in and out of focus as it weaves first closer to us and
then farther away. The clean, soft, unobtrusive background was
captured because the long lens rendered it without detail even at an f
stop of f/16. The distance from my point of focus to that background,
was long.

The simplest way to have full, or what appears to be full focus
coverage, is to keep your camera back parallel to your subject by
shooting straight down from a tripod. There is still some depth here
anyway as the wildflowers are in layers. The sharp, top layer covers
most of them. Also, it is hard to judge the sharpness of those lower
flowers as they reside down in the darkness.
I used a tripod, my 105 macro lens, with an f stop of F/18 (enough for
the top layer), and a shutter speed of about 2/3rds of one second. Not
only was a tripod necessary, but a very windless day as well.

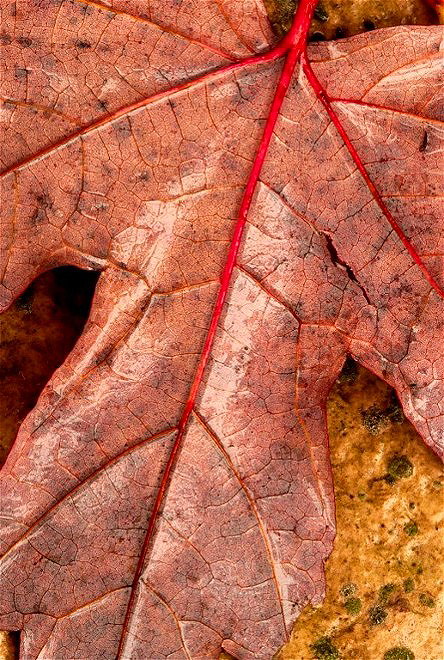
I used the same 105 macro and the same techniques and positioning for
these two sandwiched autumn leaves. I needed my depth of field to
cover both leaves and actually used f/29 to cover. My shutter speed
was 1.8 seconds so that tripod, and windless conditions were
important.
Depth of field is important, and is also a creative tool as much as it
is a necessary function.
Happy Trails and I’ll see you again,
Wayne
