I’ve probably spent equal amounts of time teaching the rules of composition and then telling everyone to break them. Those rules will definitely make any photographer who is struggling with comp, a better and more successful photographer. Breaking those same rules at the appropriate time will then set you apart from other photographers.
Four rules can be used in many compositions and they are each worth reviewing.
The rule of thirds.
Power points which are a close relative to the rule of thirds.
Leading lines.
The unnamed rule which urges you to leave a little space in the direction an animal or other subject is looking. In other words they will have somewhere to look, or to run or fly. This can apply to plants or inanimate objects as well.


You can see that both of the above diagrams are divided into thirds. Top to bottom and left to right. The four points that the lines intersect will become the power points. I am showing two diagrams only because one is closed and a square format and the other is open and a rectangle. There are leading line diagrams but the concept is pretty simple. Any line that starts near the camera and leads you to something in a distant part of the picture or completely out of the picture. The “leave the animal room” concept is easily shown with actual photos.
The point the rule of thirds and power points is to make a more dynamic image. It works. Symmetry is rarely a goal in photography. Dividing a landscape in the middle is usually boring and static. Place a primary subject like an animal or flower in the middle of the picture frame is generally going to leave you a photo that is far less than it can be. The leave room in the direction the animal is looking rule, will most often give you an image where it looks like the animal has some space rather than have its face right up against a wall. That artificial wall we have that surrounds all of our images. Leading lines are just an extra tool to use in the creation of images. All of these rules can apply whether your image is horizontal, vertical, or square.
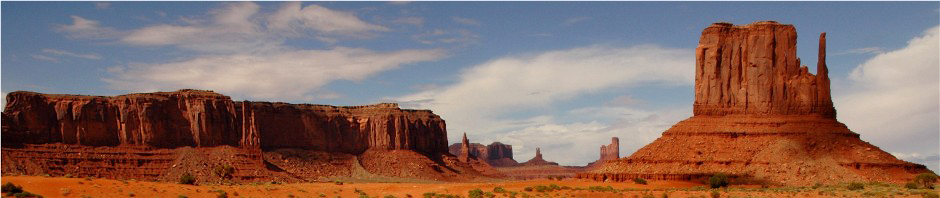
The image below is an example of using the rule of thirds. You can look at this picture two different ways but each says the rule of thirds. If you view this picture as part land and part sky, you will see that it is two parts land and one sky. If you say it is one part sky, one land and one shadow, it is divided into three thirds. The shadows drop a bit on the right side of the photo and that shows that those rules are not meant to be exact.
I would never consider using the rule of thirds exclusively for my landscape pictures. Some photographers do. In our next picture the foreground sand was far more important to me than the sky. Still comps that I made with no sky lacked the visual contrast that this scene had. I make a lot of photos with just a kiss of sky showing. Note that the patterns in the sand are leading lines.
If you can use just a kiss of sky, why not just a kiss of land. This is an effective technique when you want an open and airy feeling. This is a good way to show the prairies of the west. A feeling of a big picture is what I was after with this image.
There is always a time to forget about the rules. Instinct and serendipity are good too. You can always employ one or more of the rules if your instincts prove to be faulty.
The “leave room in the direction they’re looking or moving” rule, applies with the eagles below. The immature Bald Eagle is looking to the right, and is also implying motion as it begins to step out in that direction. This image would be far less engaging if I had centered the bird. If I had composed the bird to the right it would be a horrible image as it would appear to be going to hit “the wall”.
I used the same principle with the almost mature eagle, but I took it a little farther. The body language of the bird shows a curve that sweeps toward the left of the image. It somewhat becomes a leading line so I kept the bird far to the right to maintain the rhythm and flow. That might not have been the decision you would have made but that is what is great about photography.
I centered our next bird north and south. I wanted equal consideration to be given to both the bird and the reflection. I do this sometimes with mirror images of the land as well. You will however take note that I left a little more room in the direction it is swimming.
If you examine this picture carefully, you will see this bird is actually in the top left power point. When the subject is that large in the frame it may not be quickly apparent. I also leave room in the direction the bird is looking.
Slightly into the power point. The main point is it is not truly centered. The shift to one side is not as obvious with a vertical image because the distance from left to right is so slight. A little bit can mean a lot.
The sharpest most obvious blossom in the photo below is in the top and right third of the picture frame. It also rests near the intersection (power point) of the lines in the top right part of the image.
Leading lines are the one rule that (to me) can be interpreted in the most different ways. One of the most obvious uses of this technique is with roads, paths and streams.
Lines are a useful compositional tool so it pays to look for different sorts of lines in nature.
We all have our little pet peeves and mine is when photographers center the subject in every picture they make. It is especially bothersome (to me) when the subject is standing upright in a horizontal photo and is then centered.
I will mention again that rules are most definitely made to be broken. These rules do however work. They will make for more interesting and publishable pictures.
In the end though, these are your pictures and you should make images that bring happiness and satisfaction to you. Image making is and should be a personal thing.
Thanks

Pingback: Clean & Simple | Wayne Nelson's Earth Image's Blog